
Postpartum sterilization is a relatively low-cost and convenient option for many women, but it is too often under-utilized because many obstetricians struggle with the technique. A postpartum tubal ligation should take about ten minutes, but for many surgeons it turns into an unnecessarily longer procedure as they struggle to locate the fallopian tubes. Here are four tips (and a video) to make it easier.
1. Do the tubal as soon as possible after delivery.
In many hospitals, it’s customary to do a postpartum tubal the day after delivery or even two days after delivery. The longer it’s been since the time of delivery, the smaller the uterus. The smaller the uterus, the further it is from the umbilicus. There’s no good reason not to do a postpartum tubal ligation immediately after the delivery. This usually means waiting about an hour after delivery to make sure that the mother is stable, but waiting further only makes the case harder. Any opportunity to do the tubal ligation the day of delivery should be taken. Not only will the case be easier, but there is a greater chance that she will be able to use her epidural for anesthesia and that it will provide adequate pain relief for the surgery. This also means that the epidural can be removed that same day, rather than indwelling overnight. Obviously, there are circumstances where, for logistical reasons, the tubal ligation can’t be done immediately; either the surgeon or an operating room may not be available. In any event, every effort should be made to do it as soon as possible, even if it’s first thing the next morning. Waiting at least an hour provides the mother with an opportunity to bond with the baby during the Golden Hour. When she comes back, the baby will have had its newborn assessment and other care completed ready to greet mom. Plus, the mother will be awake without prolonged recovery associated with general anesthesia and ready to go. Waiting until the next day usually means several hours apart and recovery from general anesthetic.
2. Make a smaller incision.
When surgeons struggle doing a postpartum tubal ligation, they quickly start making bigger and bigger incisions. I’ve seen incisions under the unbilicus that are 3 or even 4 cm long in an attempt to make the case easier. If you’re using good technique, there’s no need to make a bigger incision. In fact, you’ll have a happier patient if you can contain the incision completely within the umbilicus or in the natural folds of the umbilicus. Usually an incision that’s less than 15 mm to 18 mm is able to be contained within the umbilical folds. As a rule, if you can stick one finger in the incision, even your pinky finger, then you can do a postpartum tubal through the incision. The key to making the case easier isn’t making a bigger incision; the key is to use better technique. Not only will your patient be happier with the cosmetic result, but you will save time. This type of incision can be closed with a simple figure-of-eight suture in the fascia and glue on the skin, much like a large, laparoscopic trocar incision. A curvilinear incision along the lower rim of the umbilicus is usually adequate. If you find that this is too small, the incision can be made slightly larger by extending the edges cephalad to create a U shaped incision.

3. Use a sucker tip to elevate the tube.
If you’re making a smaller incision, then you need a way of elevating the tube to the incision that doesn’t require extensive retraction or instrumentation in the peritoneal cavity. This is where the sucker tip comes into play. Make sure the tip is not hooked up to actual suction; then you use the tip to elevate the tube to the incision where it can be grasped with a Babcock clamp. Place the tip in the incision on top of the uterus, then slide it over the fundus with a fair amount of pressure until it slides up behind the uterus. This will usually push any bowel or omentum out of the way. Once the tip is placed firmly behind the uterus, draw the tip laterally with moderate constant pressure while removing the suction tip up and out of the umbilicus so that eventually whatever is sitting on top of the tip is brought up to the incision. You won’t see the tube until you get to the incision, and that’s okay: this is all done by feel. If you’ve done this well, then by the time the tip makes it to the incision the fallopian tube will be sitting immediately on top of it. You can then grasp the fallopian tube with a Babcock clamp and the rest is easy. If you don’t have the tube on the tip, then you might have the round ligament instead. This is still useful. Grasping the round ligament may allow you to use Babcock clamps to walk towards the fallopian tube. Oftentimes, what comes up on the tip is omentum. It’s the omentum that frustrates surgeons as they try to elevate the tube to the incision. The fourth tip is the best way to get the omentum out-of-the-way.
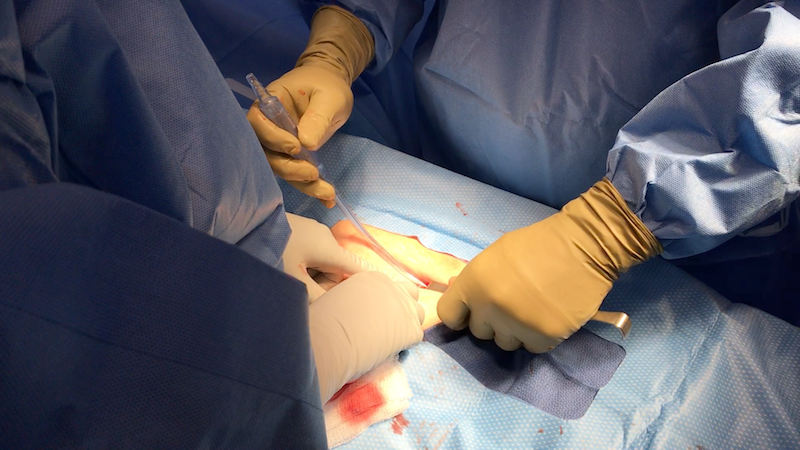
The sucker tip has hooked the tube and pulled it up to the incision in the picture above.
4. Use the table to your advantage.
Don’t be afraid to put the patient into Trendelenburg position, even steep Trendelenburg position, to get the omentum and bowel out of the way. This is by far the best way to deal with pesky omentum that keeps making the case more difficult. You can also airplane the patient to the left or right side. If you’re working on the right tube, you might airplane the patient to the left side, for example. With appropriate bed positioning, the case is usually made dramatically easier.
What else?
If you’re right-handed, stand on the patient’s left side for this procedure. This will allow you to use your right hand for the most crucial part of the case, which is the manipulation of the suction tip. If you’re left-handed, then stand on the patient’s right side.
Use a suture on a UR-6 needle to close the fascia; the acute angle of the needle will make it easier to take the sharp turn you need without putting the bowel at risk of injury.
Always make sure you identify the fallopian tube with certainty by walking down to the fimbriated portion of the tube. Then come back to about 3 cm from the cornua to perform the partial salpingectomy.
When you excise a portion of the tube, look for the “hotdog sign.” By looking at the cut portion on end, you should be able to see the inner tube (the wiener) sticking out of the surrounding tissue (the bun). This will decrease the chance that you ever accidentally resect a piece of round ligament or other connective tissue by accident.
Check out the video to see these tips in action.