
Ever get an air knot? I bet you do, especially if you are a resident or early in surgical training. Air knots can cause major complications, particularly bleeding. They are sign of looser knots in general, and looser knots are more prone to delayed bleeding and knot failure, resulting sometimes in catastrophes like fascial dehiscence or even evisceration. So better knots in general (as evidenced by fewer air knots in particular) can improve your surgical outcomes overall. Plus, you won’t need to be placing additional sutures that increase the risk of pain and injury or spending time looking back through pedicles to find the one that’s bleeding. Here are four tips to have fewer air knots and better knots in general.
1. Tie flat and square knots.
What’s a flat and square knot? Well, to start with, let’s understand what a square knot is:
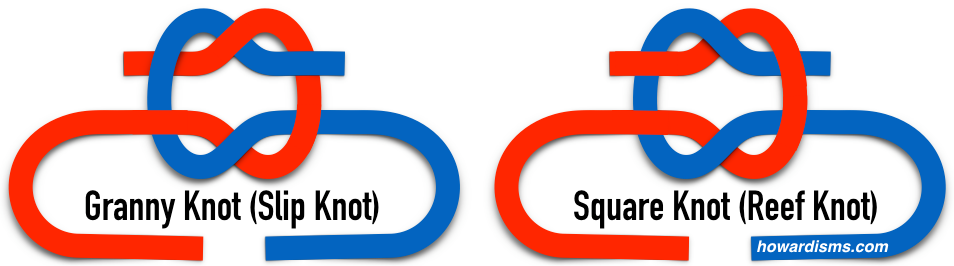
Note that a square knot and a granny knot look very similar, but are fundamentally different. A granny knot is the result of making the same throw or hitch twice, whereas a square knot is the result of making two opposite throws or hitches in a row. The granny knot in the picture shows the red lines split on different sides of the blue hook, and on the opposite side the blue lines split the red hook. But in a square knot, the red lines are on the same side of the blue hook and the blue lines are the same side of the red hook: the knot is square (symmetric). This creates greater internal friction between the lines and is therefore less likely to slip. So a good knot is square.
But being square isn’t enough. The knot must also be flat. In the picture above, the knots are flat, and if cinched down, the flat, square knot will work well in most cases. But many surgeons don’t make the knots flat, even though they might be square. Here is what a “square knot” looks like as tied by many surgeons, particularly with a one-handed knot tying technique:

In this diagram, the knot has been tied with alternating throws and is equivalent in weave to a square knot, but the red line has been held under tension and the knot has not been pushed flat. The blue line then is wrapped around the red line and becomes a slip knot with very little internal friction. Poor one-handed knot technique and the famously wrong teaching “Don’t cross your hands while tying” encourages this type of inferior knot.

This video shows how applying tension on one strand converts a flat square knot into a slip knot. Knots must be secured with opposing pressure on both tails of suture in alternating directions in order to lie down flat.
2. Try a Surgeon’s Knot.
If you are already tying flat, square knots but you are still getting an air knot, then you need a knot with even more internal friction. That’s the purpose of a surgeon’s knot, which repeats the first throw or hitch before finishing with a normal hitch.
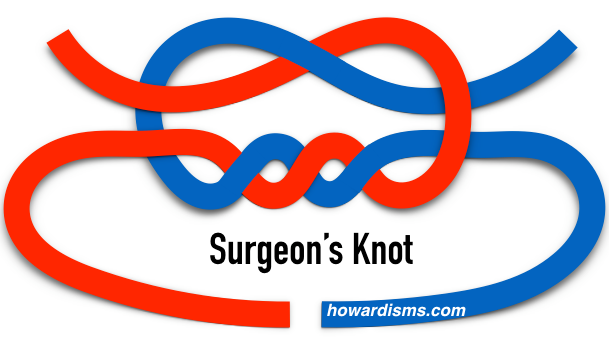
Note that surgeon’s knots can be square and not square, as well as flat and not flat. The picture above shows a flat, square, surgeon’s knot.
3. If a good knot isn’t working, try a bad knot.
Sometimes a granny knot is a good thing. The bad thing about a granny knot is that it slips; the good things about a granny knot is that it slips. If your tissue is under excess tension, deliberating tying a granny knot and then pushing it down (after completing both throws) to bring the tissue together will usually work; but, be sure to finish the knot off with a square knot to prevent it from slipping back.
4. Make a habit of making the knot build maximal internal friction.
When I tie the first throw off any knot under tension, I always tug the knot tightly three times, pulling on the tails of the suture to cinch the throw down in opposing directions. I make three deliberate tugs (repeating “One, two, three” some such gibber in my head). This builds up the friction in the throw as much as possible, and hopefully it will stay in place until you secure it with the next throw. Try it; it works!
What else?
Remember that pulling tension on just one strand at a time will actually loosen a good knot. That’s how I transformed the flat square knot to a slip knot in the video. Holding both tails under equal tension can preserve your knot, but unequal pressure will ruin it.
If you are suturing something together under a great deal of tension, have an assistant oppose the tissue for you while tying (or use a clamp).
Remember the Christmas present trick of holding a finger on the bow? Your assistant can always use a hemostat in the same way.
Check out this video for a quick review: