
“If you do only routine cases eventually even they will become difficult.”
A limiting factor for many during vaginal hysterectomy is the non-descending uterus. Women who have not given birth, for example, often pose a challenge to the vaginal hysterectomist, particularly when there is another complicating factor, like obesity or a large uterus. In general, once the uterosacral ligaments are transected, the case will get dramatically easier. I have previously commented on large trials which found that nulliparity and a lack of descent are not contraindications for vaginal hysterectomy, and indeed the vaginal route results in excellent outcomes in these patients. Nichols and Randall, in their famous book, Vaginal Surgery, go so far as to state:
“Provided the uterus is movable, the less the prolapse, the easier the operations and the anatomic challenges, findings, and solutions of no two will be identical.”
Their point was that a non-prolapse vaginal hysterectomy is accompanied by fewer anatomic variations and distortions that might lead to inadvertent injuries to the bladder or ureters, for example. So here are four more tips.
1. Don’t change your approach to an LAVH.
I recently learned from a colleague what LAVH stands for: lousy at vaginal hysterectomy. While there are certainly patients who may benefit from laparoscopic-assistance, like those with adnexal pathology or advanced endometriosis, a lack of descent is not usually aided by this approach (and it may even make things worse). The support of the uterus comes mainly from the uterosacral and cardinal ligaments, and division of these ligaments is not a part of the standard LAVH approach. Dividing the infundibulopelvic or utero-ovarian ligaments rarely makes the difficult portion of a vaginal hysterectomy any easier. Worse, because the patient is usually in yellow-fin style stirrups (rather than candy-cane stirrups), then the vaginal portion of the case will be miserable as you struggle with an inadequately positioned patient, poor exposure, and no room for your assistants.
The exception to this rule is when the uterus is not descending due to scarring of the uterus to the anterior abdominal wall, as often happens with a previous cesarean delivery. This finding may be known in advance of the surgery due to a previous diagnostic laparoscopy, ultrasound mapping of adhesions, or the presence of Sheth’s Cervicofundal Sign on exam. Sheth’s Sign is present when traction of the cervix results in a depression of the abdominal wall. These types of adhesions can be dealt with vaginally by advanced surgeons, but, in general, it is easier to cut the uterus off the anterior abdominal wall before proceeding vaginally.
Click picture for source.
While it is true that the upper pedicles are often a challenge in non-descent cases even after division of the uterosacral ligaments, this issue is obviated through other normal vaginal techniques like use of an energy sealing device which extends our safe range of securing pedicles or hemisection of the uterus or other uterine debulking techniques which provide more room to work (even in relatively normal sized but non-descending uteri).
2. Be flexible in making a posterior colpotomy.
Many challenging cases are abandoned too early when the surgeon is unable to make a posterior or anterior colpotomy. Of course, the anterior colpotomy can be delayed until near the end of the case and really shouldn’t be an issue. No good modern technique for vaginal hysterectomy encourages early anterior colpotomy.
But the posterior colpotomy needs to be made (in most cases) to make good progress (and allow division of the uterosacral ligaments). In non-descent cases, the traditional methods of making a posterior colpotomy may not work because of an inability to get instruments in the right positions and a lack of exposure. Don’t get frustrated by this, but instead consider a different approach. Here are two suggestions:
First, if using your standard technique of posterior colpotomy, consider using sharply curved Jorgenson scissors rather than curved Mayo scissors.

The acute angle of the scissors will significantly change the geometry and allow for a much easier entry. This is actually the same reason why these scissors are helpful in making the colpotomy at the time of an abdominal hysterectomy. If the initial incision attempt for the posterior colpotomy is too distal, then the peritoneal reflection may get pushed further and further toward the fundus, making the entry more and more difficult, particularly if there is already a lack of descent.
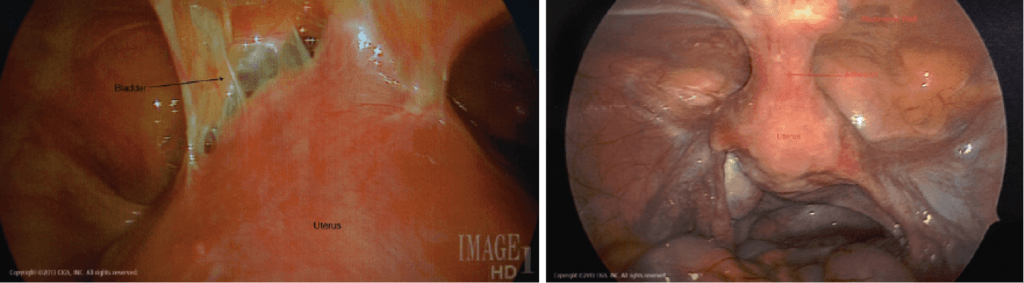
An alternative approach, such as the Pelosi method of cervicocolpotomy, can also be used. The Pelosi method for posterior colpotomy is not dependent upon uterine descent. In the Pelosi method, a vertical incision is made at 6 o’clock on the cervix and this incision is continued up the posterior wall of the cervix until the incision runs into the reflected peritoneum and a colpotomy is made. Using this technique, virtually any posterior colpotomy can be made with ease. To minimize bleeding, injection with a vasopressin solution should be performed first.
Once the colpotomy is made, the case can almost always be completed vaginally. This colpotomy will allow for transection of the main supporting ligaments and provide artificial uterine descent. Once the uterosacral and cardinal ligaments are divided, the case will usually get dramatically easier.
3. A right angle clamp is the right angle to take for a non-descending uterus.
As long as the uterosacral and cardinal ligaments are attached to the uterus, there won’t be a lot of descent. After making a colpotomy, dividing these ligaments is the next step. In the traditional method (and my normal method), a hysterectomy clamp (either a Heaney or a Glennard type clamp) is placed around the uterosacral ligament at the position of the yellow ligament below, whose tip points at the peritoneal edge of the posterior colpotomy.
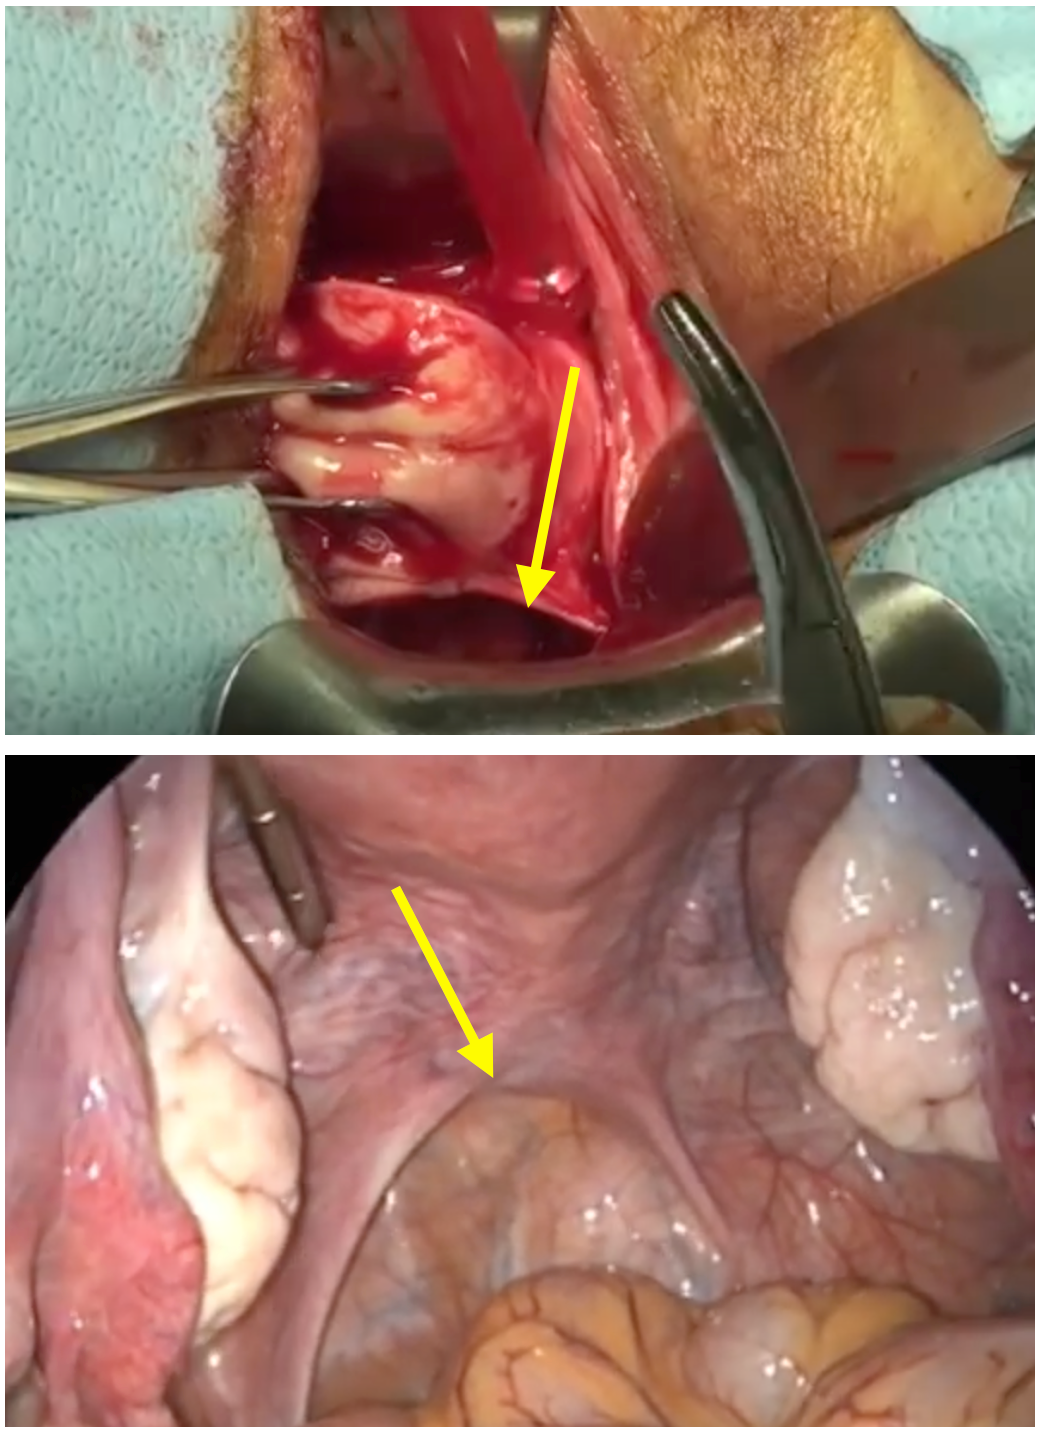
This clamp needs to fit snugly around the ligament next to the cervix to avoid increasing the risk of injury to the ureter which lies within 2 cm of the top of the yellow arrow on the laparoscopic view above. If the clamp is not sufficiently snug towards the cervix, then the tip of the clamp can quickly rotate outwards (laterally) towards the ureter.

If the clamp is rotated cephalad and lateral due to the depth of the vagina, then it may approximate the position of the dotted yellow arrow, bringing into contact with the ureter. This clamp geometry problem in a non-descent case can make it very difficult to get the clamp into the proper position. One choice is to take small serial bites with a sharply curved hysterectomy clamp; but in addition to this being time consuming, it can still be very difficult when the ligament is several inches up in the vagina.
Another approach is a modification of the Purohit method of clampless vaginal hysterectomy. In this case, dissection of the ligament is accomplished with a right angle clamp and a Bovie after the posterior colpotomy has been made.

Once the vaginal epithelium has been dissected back from over the underling ligament, the right angle clamp can be inserted along the yellow arrow above, fitting snugly against the cervix (away from the ureter).

The degree of descent is now irrelevant as this technique can be employed even several inches into the vagina. With the clamp slightly opened, a Bovie can be used to divide the tissue between the jaws of the clamp.

Clips taken from here.
The clamp can be sequentially repositioned more anteriorly until the full uterosacral ligament is divided and the insertion of the cardinal ligament also divided. The normal size uterus usually descends significantly after this has been done on both sides and the rest of the case proceeds normally.
4. Make some room.
In rare cases, it may be necessary to cut an episiotomy or a Schuchardt incision. Certainly don’t do this routinely, but if you find that the space between the weighted speculum posteriorly and the anterior vaginal wall retractor is only about 3 cm or less, then this step will usually become necessary for complicated cases.
Bonus tips.
I’ve previously described some other tricks for non-descent cases. The Doderlein-Kronig technique of massaging the uterosacral ligaments at the beginning of the case, adds up to 1 cm of uterine descent. I find myself doing this at the beginning of most cases. Positioning the patient in the reverse Trendelenburg position and making sure that the buttocks extend off the bed helps get more depth out of the weighted speculum and enhances exposure significantly. The further in the weight speculum is positioned, the easier it is to place clamps on the uterosacral ligaments. In fact, the assistant should routinely press the speculum into the vagina while the surgeon places the initial clamps on those ligaments.
Read more at Simplified Vaginal Hysterectomy and Four Tips For Vaginal Hysterectomy.